

Here are instructions to make a mask from cotton cloth, with two layers, with ties and/or elastic at the sides so that it actually stays on my head. It is modelled on a laboratory mask.
A special feature is that there are two pockets next to the nose, so that you can stuff them to fill the gap between nose and cheeks, if you like.
Another feature is that there is wire along the nose piece which you can pinch to shape across your nose.
This mask is sustainable – please wash and reuse as often as you wish, until it wears out.
This is NOT A SURGICAL MASK
It is two layers of cotton, in the form of a surgical mask: it stays on your face and depends on a reasonable seal between the mask and your face.
The idea is to restrict air flow and stop air going from someone else’s breath straight into your lungs! It won’t be a 100 per cent safety net, but No Mask of this type will be. It may dramatically reduce the DOSE so that your body can deal with the virus with your own amazing immune system which will build up a resistance.
This is how the mask ties….

Ironing board ahoy 
Tie behind head 
It’s on 
Genuine lab model
The fun part: get out your sewing machine and ironing board and TAKE OVER THE LIVING ROOM.
IRON (with steam) the fabric flat.
I was using the surgical mask as a pattern, but you can use my measurements.

Side 
Top 
Pleats opened out 
HOW I GOT THE MEASUREMENTS
The pieces are a bit bigger than the mask which is 7 inches (17cm) square – we add at least an inch either side, nothing at the bottom (where the fold is) and an inch and a half (3cm) at the top. For a large face you can add an inch either side but this fits most faces.
Top needs an inch so that you can fold over and make a ‘hem’ pocket for wires (to take the shape of your nose bridge).
Sides need much less as they will be sewn together.
I show the mask measurements. In this picture I have spread out the folds in the mask to get the measurement.
In the picture you see that when folded the sides are only 4 inches deep. There are 3 zig zag pleats.
Note that the ribbons tie UP and DOWN, not side to side – this helps pull the mask around your face.
Straps/ribbons/ties are 40cm long but need to fit along the side of the mask as well. I make them with the same fabric so that the grip when you tie them is good (silky ribbons come undone).
You can use elastic at the top if you have a lazy person (who won’t tie two ties). Actually this works really well, as you can slip the mask on, and don’t have to tie it at the bottom unless you want to. Yes, that makes me a lazy person, but intensely practical.
CUT FABRIC (I used new cotton, with a fine weave.)

Main part a bag 
Bag with hemmed top 
Two hems, top 
Slightly bigger than model
So you start with a piece of fabric about 8 inches by 16 inches (folded in half).
Also, for the tie ribbons cut two (or four) pieces that are about one and a quarter inches (2.5-3cm) by 50 cm, for each ribbon. If you want ribbons top and bottom cut two long ribbons, about 1m long.
Iron/steam the top edges so that you form a hem – fold over the material twice. Steam it down in place.
Pressing makes it easy to sew without pins – then sew those two top hems – and yes it’s my Grandma’s old Singer!
Next, with the mask inside out (you are looking at the back of the fabric) sew the sides. Don’t sew over both hems you made, as you need to insert something.
Now you have a pocket, with nice sewn hems top and bottom.
Turn it the right way out.
Iron it the right way out, side seams inside.
This is a good time to iron in the pleats – there are two shown here YOU NEED 3 pleats.

Iron (steam) bag 
Hard 
Pleats
Then use some kitchen tie wire (I think this came from Hobbycraft) and cut two pieces of the plastic coated wire so that they will fit exactly into the top hem. Thread them in.


Now sew across the top, putting the two hems together.
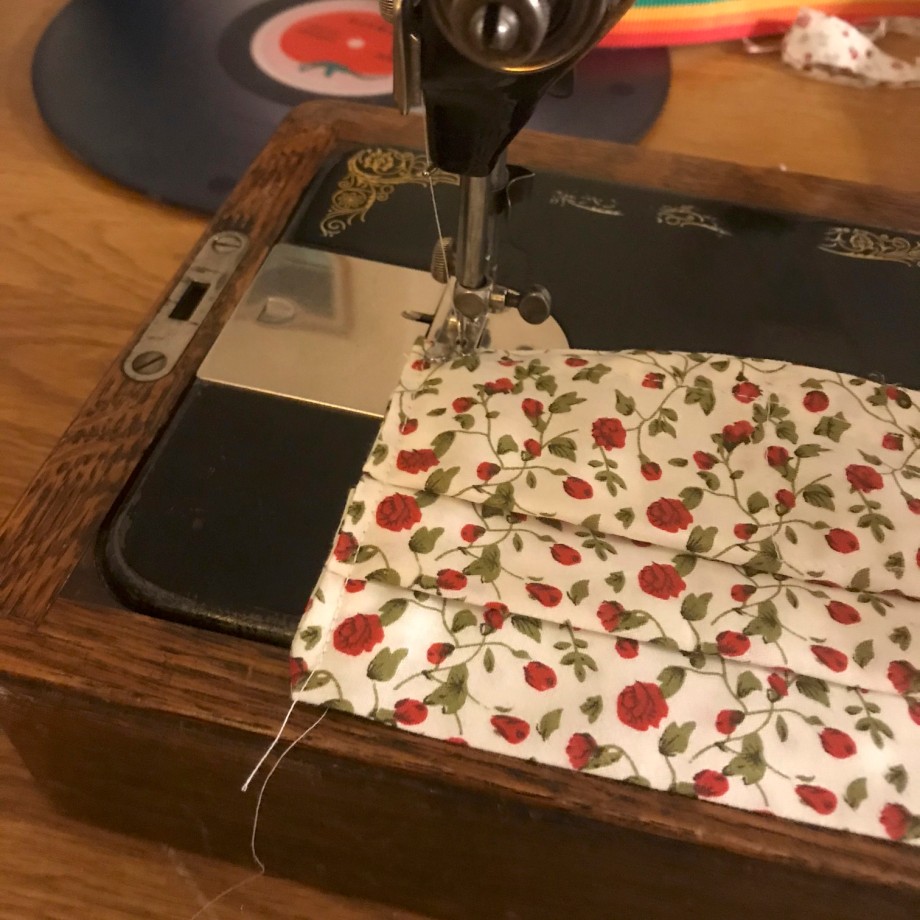
If you want you can do some clever pockets either side of the nose… for these, travel down and back up to create two pockets (see my fingers in them). Later, you can stuff these to make a better seal around your nose (use a little plastic from a plastic bag, or cotton wool – you can replace it as needed).

Sew down the sides of the mask too, to fix the pleats. One or two rows of stitching – you will restitch when attaching the ribbons.

Pockets to stuff 
Fix pleats 

See how the ribbons eventually are stitched over the sides….


we’ll do this later.
The wired hem is at the top, front – see how the first pleat works so you get your mask the same way round as the model.
If you want elastic, I put mine at the top and sewed them into place about 4 times (rows of stitches, zig zagging across the elastic). The elastic is a single piece and should fit comfortably around your head: it is slightly wider than the cloth part of the mask.
NOW FOR THE RIBBON TIES.
These are the 50cm or 90 cm pieces made earlier.
First, iron/steam them in half, then create small hem seams. (3 folds, so that you turn the raw edges in to the inside).
When you have flattened it with the iron the ribbon is easy to sew.
Don’t forget to turn in the end so that the raw edges are buried, as you start.
When you have about 10 cm left to sew (short ribbon) or are in the middle (I put a pin into the middle to mark it), put the edges around the sides of the mask and sew onto the mask.


Honestly, this is why I love my Grandma’s machine, because I can sew really slowly and control every stitch.
This mask has 4 ribbons as requested.
All done.
Stuff the nose pockets if you want.
Pinch the wire so that it fits well around the nose.
The ties both go quite high on the head.
Don’t forget to wear it, particularly in enclosed spaces.
This mask will be washable. Use cold water and air dry it, to preserve the starchiness, or restarch and iron it.
DISCLAIMER. This will not prevent infection, but it WILL HELP.
This sewing recipe was developed by Helen Imogen Field. Contact her on imogenart@gmail.com if you have any questions.